Halloween is getting closer. I like all cute and kawaii. It also includes Halloween.
My Halloween set - up for this year on photos.
It´s a season worth celebrating with handmade stuff, for example you could make a lovely bunch of little amigurumi crochet pumpkins and set up a scene with all those lovely colors. I also place real pumpkins, of course, there´s all shapes and sizes and what colors, OMG! (carved pumpkins to come) and my dear fuchsia is also taking part in this scene (in it´s autumn colors). We had the first snow as well in Estonia.
Click on the pics to see large photos!
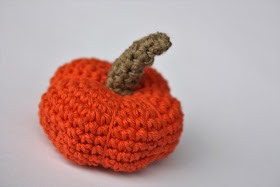
This is the smallest pumpkin I´ve even made. I made it look like a real pumpkin with just a small touch of artist´s acrylic paint.
You´ll need 2mm or 2,5mm crochet hook
DK or Fingering weight yarn (all shades of orange, even with a touch of brown and yellow). Some yarn for a stalk, something greyish.
Tapestry needle and here we go:
1) 6 sts. into magic ring (6)
2) 6 x Inc (12)
3) [Inc + 1 sc] all around (18)
4) [Inc + 2 sc] all around (24)
5) [Inc + 3 sc] all around (30)
6) [Inc + 4 sc] all around (36)
7-11) sc all around (36)
12) [Invdec + 4 sc] all around (30)
13) [Invdec + 3 sc] all around (24)
14) [Invdec + 2 sc] all around (18)
Do the medium stuffing
15) [Invdec + 1 sc] all around (12)
16) Invdec all around (6)
sc- single crochet
Inc- 2 single crochet into one
Invdec - invisible decreasing - 2 single crochet together.
Make a „neat finish“ Have a look how to do it in here: finishing up an amigurumi piece, leave at least 30 cm of yarn to continue:
Video tutorial can be found here: crochet pumpkin - giving shape
Video tutorial can be found here: crochet pumpkin - giving shape
Tiny amigurumi pumpkin, part 2
Sew through the middle of the ball
and go around to the bottom again,
and right through the ball again. Tighten it a bit.
Go all the way round for a total of 4 times. Make a knot, hide the yarn
Start making the stalk
You can leave a st. undone here and there
Hide the yarn like this and...you´ll have a lovely curved stalk
If you want a
lovely Kawaii Crochet Pumpkin, then follow the pattern, but place eyes instead
and there´s no need to tighten the pumpkin with the yarn. And that´s it. Add some pink cheeks and
little mouse to make it look like a kawaii:)
Enjoy!
Happy Halloween!
Happy Crocheting!


No comments:
Post a Comment