Amigurumi Heart - Free Pattern
I´ve created a lovely little heart design, easy and a quick make. They can be individual gifts, accessories (hair ties, also shown in this post) or decorations for gift bags. You just name it, enjoy!
Printable PDF + Videos can be found in my Etsy shop:
Crochet Tutorial:
2,5 crochet hook
Yarn: Katia Bamboo, DK/8ply
yarn needle
stuffing
Abbreaviations used:
"magic ring": crochet over an adjustable loop with 6 single crochet, then pulling on the yarn tail until there is no hole left
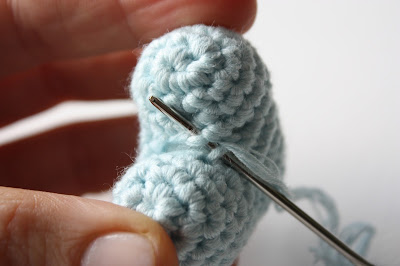
"Neat finish"- one method to finish a toy piece in amigurumi. See the photos below.
Sc - single crochet
Inc - Increase
Invdec - invisible decrease
1) 6 sc into magic ring (6)
2) 6 x Inc (12)
3-4) sc all around (12)
fasten off
make another one:
1) 6 sc into magic ring (6)
2) 6 x Inc (12)
3-4) sc all around (12), don´t fasten off, you will join two parts together
Make the joining into next stitch of the end of the first part
You´ll have a new beginning of the row: hide the yarn tail by doing so: do your stitches over the yarn tail, by doing so, you don´t have to hide the yarn afterwards.
1) Make 12 sc on the first part and then 12 sc on the other part of the heart (24):
under both loops, there will be a little hole between two parts, we´ll come back later to close it up.
I use yarn as a stitch marker of a new row.
2) 5 sc, Invdec, 10 sc, Invdec, 5 sc
3) 4 sc, Invdec, 9 sc, Invdec, 5 sc
4) 4 sc, Invdec, 8 sc, Invdec, 4 sc, stuff
5) 4 sc, Invdec, 7 sc, Invdec, 3 sc
6) 3 sc, Invdec, 6 sc, Invdec, 3 sc, from now on, try to stuff after every new row
7) 3 sc, Invdec, 5 sc, Invdec, 2 sc
8) 2 sc, Invdec, 4 sc, Invdec, 2 sc
Two rows before the finishing up:
9) 2 sc, Invdec, 3 sc, Invdec, 1 sc
10) 1 sc, Invdec, 1 sl.st. leave a length of yarn for "neat finish" and closing up the hole. For a "neat finish": pick up all the sc left, one by one with the yarn needle and pull them together to have a neat and proper finish.
Well done, your cute little heart is ready!
Make a nice bunch of hearts. Personally, I like the green one. In some disciplines, green is the color of heart :)


Your little hearts are lovely. Thanks for the pattern.
ReplyDeleteThank you so much for sharing!
ReplyDeleteGlad I found this cute little pattern. Will be making these for my daughter's classsroom. She is a 2nd grade teacher. Thank you
ReplyDeleteSue, thank you :)
DeleteThanks for this tutorial! Super cute! I love your patterns!
ReplyDeleteVicki (I linked to this in my blog http://knittingdragonflies.blogspot.com/2017/11/show-little-love-today.html
Thanks
I´m glad you named it a no stress project :)
ReplyDeleteA little help, please? After the magic circle do I chain one before begin the 2nd round, increasing to 12? After every round do I chain one or just keep going with a stitch marker?
ReplyDeleteHi, no extra chain sts. you´ll go directly to the next row - like you said, you´ll go with the st. marker
DeleteAwww thank you for the pattern, I'm going to make them into a cot mobile for my granddaughter x
ReplyDeleteThank you very much! 😊😍❤
ReplyDeleteI made your cute heart. could you tell me what ' NB! ' stands for in the pattern. thank you. :)
ReplyDeleteThank you! NB! Nota Bene - Please Note - under both loops, nothing else :)
DeleteThanks such such a great pattern. I extended one of the halves by 4 rounds before joining, and sewed two hearts together to make antlers for my ami reindeer. I used #10 thread and a 1.50mm hook. They look so cute.
ReplyDeleteHello Cathy! Thank you for your feedback. What a great idea - amigurumi heart is always a nice addition to other amis :)
Delete