Showing posts with label jouets. Show all posts

Wednesday, September 6, 2017

Silk and Cotton and a Teddy Bear - it´s a boy, again!


Lucas the Teddy is a teddy bear that I can just crochet over and over again and I´m never get tired - all teddy bears often have this impact on me - I just adore teddy bears and want to try different yarns and sizes (one example in process). This teddy bear is crocheted from silk and cotton yarn. I got this yarn on my trip to Finland and when I saw this silk and cotton yarn I knew this is a yarn I want to try out (you should see my desk, it´s full of yarns I want to crochet with). It´s a lovely grey color with a soft pastel shade. (I always like grey, you can combine it with every color, just so convenient). I used 2,5mm crochet hook (Clover) and 6mm black safety eyes. Nose (watch the video how to embroider the teddy´s nose) is embroidered with cotton thread (I can use a variety of shades for a different look). I love my little terrasse full of flowers (getting more and more obsessed by them). Autumn is coming but I still like to sit even for 10 minutes to enjoy my tisane :)

Lucas the Teddy est un ours amigurumi que je peux crocheter de nouveau et je ne me fatigue jamais - tous les ours ont souvent cet impact sur moi - J'adore les ours crocheté en amigurumi et je veux essayer différents fils et tailles (un projet en cours). Cet ours en crochet est realisé de fils de soie et de coton. J'ai trouvé ce fil sur mon voyage en Finlande et quand j'ai vu ce fils de soi et de coton, je savais que c'est un fil que je veux essayer (vous devriez voir mon bureau, il est plein de fils avec lesquels je veux crocheter avec). C'est une belle couleur grise au teint pastel. (J'aime toujours le gris, vous pouvez le combiner avec toutes les couleur, c´est très pratique). J'ai utilisé un crochet de 2,5 mm (Clover) et des yeux de sécurité noirs de 6 mm. Le nez (regarder la vidéo comment broder le nez d´un ours) est brodé avec un fil de coton (je peux obténir une variété de nuances utilisant couleurs différentes). J'aime ma petite terrasse pleine de fleurs (de plus en plus obsédée par celles-là). L'automne arrive, mais j'aime encore m'asseoir même pendant 10 minutes pour  profiter de mon tisane :)
PS! Lucas the Teddy modèle est en Anglais, mais j´ai aussi les abréviations en français et il y a beaucoup de photos.


                                                              Thank you for stopping by! Laura


Sunday, June 24, 2012

Amigurumi toys - free snake pattern


Hi, I have made amigurumi patterns for some time now. My shop on Etsy: TinyAmigurumi just had a birthday: 1 year.
I´m going to share my amigurumi snake pattern for free. Enjoy! 

Free amigurumi snake pattern

Amigurumi snake is crocheted in the round.  Do not join rounds. Mark the beginning of your rounds with a stitch marker or safety pin. I use the same yarn left from the beginning, choose the best way for yourself how to mark the rows. You will have lots of photos to help you!

Size: with 2mm crochet hook: 40 cm

 Tools and materials what you´ll need:

Cotton yarns, 10-12 mm safety eyes with slit pupil, for filling: preferably sheep wool or fibrefill. Stuff gradually.

Crochet skill level:

Confident beginner: requires knowledge of basic crochet terms: Crocheting in the round, forming a magic ring, single crochet stitch (sc), single crochet increase (Inc), single crochet invisible decrease (Invdec).

Terms:

“Magic ring”: adjustable loop with 6 sc, pulled together tightly, there is no hole left.

“Neat finish”: one method to finish a toy piece in amigurumi.

Abbreviations used: Sc – single crochet; Inc – increase; Invdec – invisible decrease.

1) 6 sc into magic ring

2) 6 x Inc (12 sc)

3) 12 x Inc (24)

4-5) sc all around (24)

6) [1 Inc, 11 sc] x 2 (26)

7) [2 x Inc, 11 sc] x 2 (30)

8-9) sc all around (30)

10) 23 sc, 1 Invdec, 5 sc (29)

11-14) sc all around(29)

15) 2 x Invdec + 11 sc, 2 x Invdec + 10 sc (25)

16-17) sc all around (25)

(attach safety eyes: look photos 2-6)

18) 1 Invdec, 11 sc, 1 Invdec, 10 sc (23)

19) 18 sc, 1 Invdec, 3 sc (22)

20) 6 sc, 1 Invdec, 14 sc (21)

21- 82) sc all around (21)

83) 1 Invdec, 19 sc (20)

84- 88) sc all around (20)

89) 8 sc, 1 Invdec, do the same (18)

90- 99) sc all around (18)

100) 1 Invdec, 7 sc, do the same (16)

101-107) sc all around (16)

108) 6 sc, 1 Invdec,  do the same (14)

109-115) sc all around(14)

116) 1 Invdec, 5 sc, do the same (12)

117-121) sc all around (12)

122) 6 x Invdec (6)

Do the „neat finish“: photos 10-13 

1. Here you can see how I use yarn left from beginning to mark rows.

2. If you use safety eyes, place them between the 12 th and 13 th rows, do this once you have completed the 16 th row. I would advise you to make pre- holes with the end of your crochet hook for easier insertion.


3.Here You see safety eye without the washer.


4. For easier placement I push the washer with two fingers at the same time.

Before attaching the washer be sure the eyes are in the right place because you can't make changes once the washer is on.

5. Here You´ll see the safety eye after attachment.


6. Now You can stuff, You can use the other side of the crochet hook. Stuff the head really tightly.

7. 1/3 of the work is done. Stuff gradually.

8. I also use another yarn as a row marker, because the yarn of the beginning is now too short.

9. Finishing the snake: it´s a bit hard to crochet and even harder to stuff. Again I use the other end of the hook. I use wool for stuffing.


10. At the end, I cut the yarn and start to make „neat finish“. For that I pick up all the sc left, one or two at the time and…


11.I pull them together, this creates a neat finish.


12. Then I start to hide the yarn.


13. Then You´ll have a neat finish.

14. Properly hiding the yarn gives toys a better finish.


15. You can embroider your snake as You wish. 


Well done, Your snake is ready!


Kids will love it and not only...:)

Feedback and comments are always welcome!
Please, if You use my pattern, refer to my site. Thank You!

Special thanks to Leah and Kathryn who tested my snake pattern in English.

Sunday, July 31, 2011

Amigurumi Hippo PDF pattern!


There´s a story with every crocheted amigurumi toy that I have made. I have made two amigurumi hippos but they already live their own beautiful life. I started to miss the hippo! At the same time some people started to ask the pattern as well. It was time to make a new one!
Mostly I like to use cotton yarn with these tiny amigurumi toys. Quite many toys have been crocheted with Hanna Cable, GB Wolle. As I make tiny cuties, I like to use 2 mm crochet hook, but my patterns should be adaptable for bigger hook sizes as well.  Hippo is going to be approx. 6 cm long using 2 mm crochet hook as I did. My amigurumi friends used 3mm and 3, 5mm crochet hook and they succeeded perfectly.

In my opinion one of the most important thing with these tiny toys is joining pieces together, it needs a bit of patience:)

If you learn some basic crochet terms like: Crocheting in the round, forming a magic ring, slip stitch (sl st), single crochet stitch (sc), single crochet increase (Inc), single crochet invisible decrease (Invdec), how to make a color change and joining pieces together then my patterns are easy to follow! Nothing hard really! You just have to want to make amigurumi cute things and if you add your feelings as well, there´s always going to be a lovely result! In any case, it works with me:)

Of course there are some tips as well. With this amigurumi hippo pattern I try to show You how I love to join amigurumi toy parts together. I love to use pins in every way. One example:


My written patterns are always with pictures to help you! Personally I love photos to go with the tutorial! 

You will find this beautiful amigurumi hippo pattern in my Etsy shop.
And in Raverly.


Hippos are cute little creatures. They are often used in many forms on children´s clothes and on accessories and personally I love it. Also something that is convenient for boys as well. Why not making a little crocheted hippo for someone you care about. 

My dear amigurumi friends tested it: Amiguria


Nouveau patron amigurumi: Hippo au crochet, est disponible dans mes boutiques: Etsy and in Raverly avec 14 photos pour realiser ce petit hippopotame! Le patron est en anglais.
L´hippo est réalisée en "rangs continus", comme tous les amigurumi jouets - il ne faut
pas fermer les rangs ou tourner la pièce. On peut utilise un marqueur pour indiquer le
début des rangs ou bien le fil pour marquer le début de rang.

Comme une décoration, cadeau naissance pour bébés et pour chambre d´enfants.


Sunday, June 19, 2011

Crocheted amigurumi sheep/Mouton amigurumi au crochet

Firstly, I have managed to open my pattern store both in Etsy and in Raverly.  I have been asked several times to make written patterns with my designs. Now the first one is done: amigurumi snail. For celebrating it, I made one amigurumi snail with lots of colours. It´s very hard work to make patterns, that is why I am very happy that the first one is ready, tested and available for other little amigurumi lovers:)


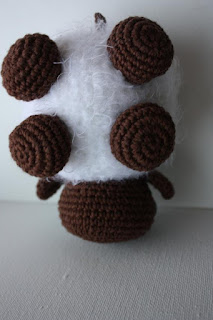
Secondly, I made an amigurumi sheep, a little version of the amigurumi sheep. For a 4 year old boy as a birthday gift. It´s 8 x 8 cm. I used the same size of safety eyes: approx. 1, 5 cm. Little sheep with extra big eyes:)
I like to draw as well, so it was quite appropriate to add a drawing of sheep as well. 

Premièrement, j'ai réussi à ouvrir ma boutique des modèles amigurumi dans Etsy et dans Raverly.  Maintenant, le premier modèle amigurumi est fait: escargot amigurumi. Pour le célébrer, j'ai fait un escargot amigurumi avec beaucoup de couleurs. Il est très difficile de créer les modèles, c'est pourquoi je suis très heureux que le premier est prêt, testé et disponibles pour d'autres qui aiment les petits créations amigurumi.


I used brown cotton yarn and this yarn is a bit stronger than the normal cotton yarn. I have promised to make one amigurumi sheep pattern as well, now there´s two options: right now I would even make the tiny one:)
These tiny yarn animals are perfect gifts for young children, they are always very happy to receive those crocheted handmade toys. I like the saying that you should offer something you would like to receive yourself. I would like to have this crocheted sheep:) I have two kids, they are very happy to offer this kind of gifts for the others.
J'ai utilisé un fil de coton brun et ce fil est un peu plus fort que le fil de coton normal. Ainsi, j'ai promis de faire un modèle de mouton amigurumi , il y a maintenant deux options: en ce moment, je dirais même le petit:)

Ces animaux minuscules au crochet sont des cadeaux parfaits pour les jeunes enfants, ils sont toujours très heureux de recevoir ces jouets faits à la main au crochet. J´aime offrir quelque chose que  j ´aimerais recevoir
moi-même. Je voudrais avoir ce mouton:) J'ai deux enfants, ils sont très heureux d'offrir ce genre de cadeaux pour les autres.


I like to create little toys!
J'aime créer des petits jouets!


Saturday, December 18, 2010

Handmade toys- Lovely amigurumi sheep!- Petit amigurumi mouton au crochet!


I love sheep, I´m used to draw them, now I made a crocheted one as well. This amigurumi sheep was made for a little boy as a birthday present. It´s 12 cm in lenght and 8 cm in high.
I used only safety eyes to make the face, nothing more, I wanted it to be simple but cute.


J'aime les moutons, je suis habitué à les dessiner, maintenant j'ai fait un amigurumi mouton. Ce mouton d´amigurumi a été faite pour un petit garçon comme cadeau d'anniversaire.

J'ai utilisé les yeux de sécurité, rien de plus, je voulais que ce soit simple mais mignon.